public class testGoat : MonoBehaviour
{
    public Rigidbody body;

    // Update is called once per frame
    void Update()
    {
        if (Input.GetKeyDown(KeyCode.A))
        {
            Vector3 diffVector = new Vector3(1, 1, 0);
            body.AddForce(diffVector * 1500);
        }
    }
}
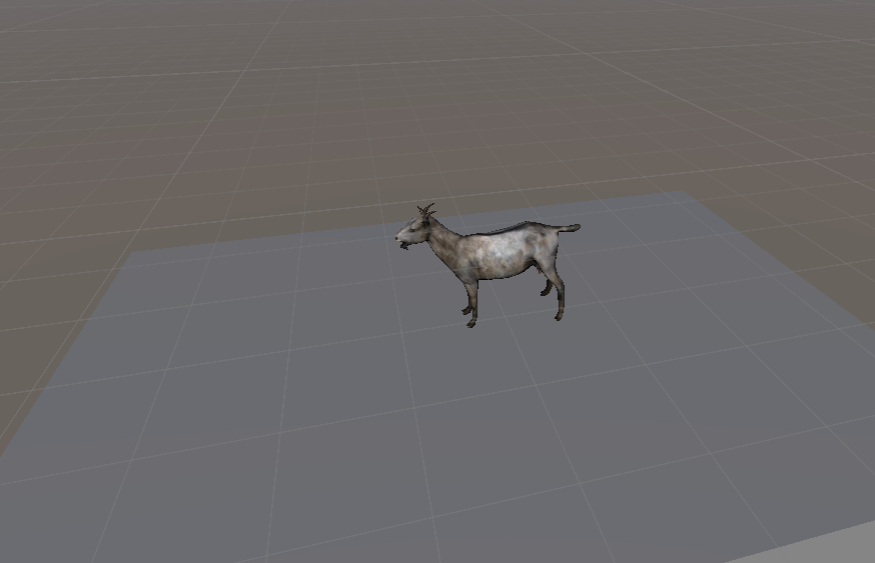
위 스크립트는 키보드 A를 누르면 body라는 리지드바디 오브젝트를 1,1,0 벡터로 쏴주는 스크립트다.
해당 스크립트의 Rigidbody를 지정해줘야한다.
힘을 어디에 주느냐는 본인의 상황에 맞춰서인데 나는 척추에다가 힘을 줘서 몸통이 날아가는 느낌을 주고 싶었다.
rigidbody 컴포넌트에 작동을 시켜야 하니 래그돌을 생성할 때 지정했던 오브젝트 부분에 다가만 힘을 줄 수 있음을 추측할 수 있다.
근데 오브젝트를 날리다가 보면 충돌로 인해서 다른 방향으로 가게 되는데 이 문제를 해결하는 방법은 다음에 소개하도록 하겠다.
SaveGameData는 csv파일로 데이터를 불러오면 해당 데이터를 json 형태로 txt 확장자로 저장을 한다. (json 파일을 읽어 올 수 있다면 json으로 저장해도 되지만 Resources.Load<TextAsset>("Texts/"+fileName);로 텍스트 데이터를 불러올 때 json으로 잘 안 불러지길래 txt로 저장하였다.)
LoadGameData는 저장된 json 형태의 txt 파일을 조회한다.
LocalizationData
텍스트 데이터를 들고 다니기 쉽도록 포장처리하는 데이터 형태라고 보면 된다.
[System.Serializable]
public class LocalizationData
{
    public LocalizationItem[] items;
}

[System.Serializable]
public class LocalizationItem
{
    public LocalizationItem(string key, string value)
    {
        this.key = key;
        this.value = value;
    }
    public string key;
    public string value;
}
너무 간단하다.
json으로 데이터 읽고 쓰기 가능하도록 Serializable 선언
하나의 LocalizationItem의 배열 형태 items에 현재 언어에 해당하는 LocalizationItem 데이터를 전부 다 넣고 나중에 key로 조회를 한다.
LocalizationManager
로컬라이제이션을 총괄하는 스크립트다.
게임의 곳곳에서 참조를 해야 하기 때문에 싱글턴 패턴으로 선언한다. 싱글턴 패턴 설명에 대해서는 생략한다.
missingTextString는 키값이 없어서 불러오지 못한 텍스트에 대한 기본값이다.
fileName은 불러와야 하는 파일명으로 eng.txt면 eng를 넣으면 된다. 자세한 설명은 나중에 하겠다.
public void LoadLocalizedText(string fileName)
    {
        localizedText = new Dictionary<string, string> ();
        TextAsset mytxtData=  Resources.Load<TextAsset>("Texts/"+fileName);
        //파일 정상적으로 읽어오는지 확인
//        Debug.Log(Resources.Load<TextAsset>("Texts/"+fileName));
//        Debug.Log(fileName);
//        Debug.Log(mytxtData);
        string txt=mytxtData.text;
        if (txt!="" && txt!= null) {
            string dataAsJson = txt;
            LocalizationData loadedData = JsonUtility.FromJson<LocalizationData> (dataAsJson);

            for (int i = 0; i < loadedData.items.Length; i++)
            {
                //불러오는 데이터 확인
                //Debug.Log(loadedData.items[i].key + ":" + loadedData.items[i].value);
                //공백데이터가 여러개 들어가면 오류발생
                if (!localizedText.ContainsKey(loadedData.items[i].key))
                    localizedText.Add(loadedData.items[i].key, loadedData.items[i].value);
            }

            Debug.Log ("Data loaded, dictionary contains: " + localizedText.Count + " entries");
        } else
        {
            Debug.LogError ("Cannot find file!");
        }

        isReady = true;
    }
Debug.Log는 참고용으로 주석 처리해놨는데 필요시 주석 해제하면 무엇이 문제인지 확인이 쉽다.
해당 함수는 fileName에 해당하는 즉 언어에 해당하는 txt 파일을 불러와서 딕셔너리 형태의 localizedText에 언제든 꺼내 쓸 수 있도록전부 다 넣어준다.
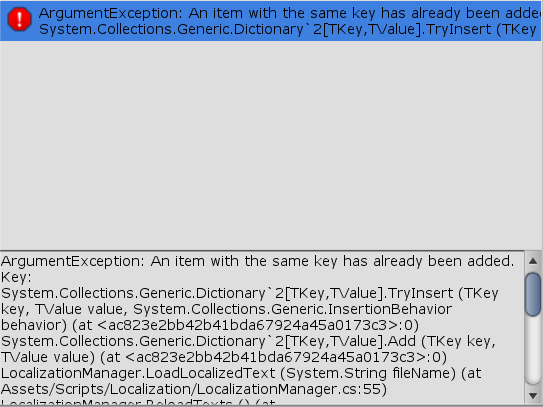
여기서 아까 csv파일의 특성으로 인해 생기는 공백 데이터가 문제를 일으키는데 지금 넣어놓은
if (!localizedText.ContainsKey(loadedData.items[i].key)) 이 부분으로 예외처리를 해서 문제는 발생하지 않을 것이다.
만약 저렇게 예외처리를 하지 않는다면 공백 데이터가 2개 들어가 버려서 txt 저장할 때는 문제없는데 게임 실행하면 저렇게 오류가 발생한다.
public string GetLocalizedValue(string key)
    {
        string result = missingTextString;
        if (localizedText.ContainsKey (key))
        {
            result = localizedText [key].Replace("\\n","\n");
        }

        return result;

    }
나중에 텍스트 컴포넌트에 부착된 LocalizedText에서 key로 value값을 조회할 때 사용된다. \n 치환은 개인적으로 저 부분이 자꾸 문제를 일으켜서 넣어놨는데 없애도 괜찮다. (왜있는거지 ?? 나란 괴물...)
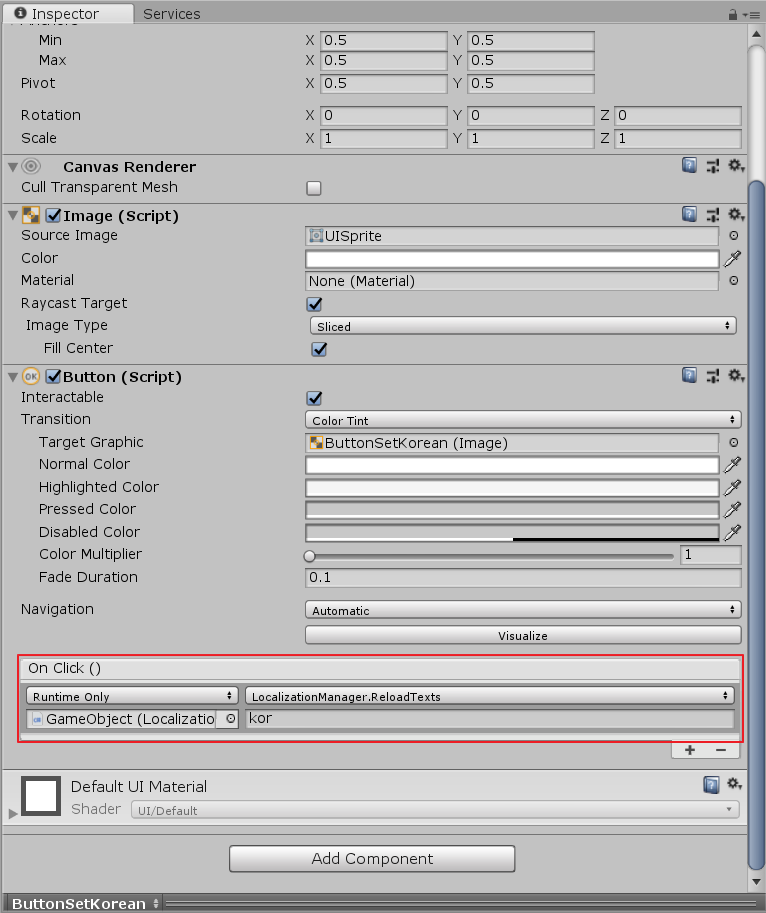
public void ReloadTexts(string fileName)
    {
        LoadLocalizedText(fileName);
        foreach (LocalizedText text in FindObjectsOfType<LocalizedText>())
        {
            text.ReloadText();
        }
    }
나중에 버튼과 연동시켜서 언어를 바꿀 때 쓰는 기능이다.
유의할 점은 FindObjects 함수는 게임 오브젝트가 enabled 된 컴포넌트만 가져오기 때문에 꺼져있는 텍스트는 바뀌지 않는다.
저렇게 Reload를 한다고 전부 다 바뀌는 것이 아님을 알아둬야 한다.
컴포넌트에 OnEnable을 사용하여 별도로 새로고침 하는 과정이 필요하다.
LocalizedText
Text 및 TextMeshPro에 붙어서 로컬라이제이션 값을 가져와 교체해주는 컴포넌트
using System.Collections;
using System.Collections.Generic;
using TMPro;
using UnityEngine;
using UnityEngine.UI;

public class LocalizedText : MonoBehaviour {

    public string key;
    private Text Text;
    private TextMeshProUGUI TextPro;
    // Use this for initialization
    void Start ()
    {

    }

    private void OnEnable()
    {
        Text = GetComponent<Text> ();
        TextPro = GetComponent<TextMeshProUGUI> ();
        ReloadText();
    }

    public void ReloadText()
    {
        if (Text != null)
        {
            Text.text = LocalizationManager.Instance.GetLocalizedValue (key);
        }
        if (TextPro != null)
        {
            TextPro.text = LocalizationManager.Instance.GetLocalizedValue (key);
        }
    }
}
아까 말한 대로 OnEnable을 통하여 활성화되었을 때 새로고침을 하도록 한다.
ReloadText 함수는 텍스트 컴포넌트가 존재하면 로컬라이제이션 매니저에다가 값을 질의하여 텍스트를 교체해준다.
여기까지 핵심 스크립트에 대한 설명은 끝났다. 자세한 사용 방법을 알아보도록 하자.
4. 샘플 프로젝트 및 참고 링크
먼저 영상을 보고 무슨 샘플 프로젝트인지 보자. 음식 이름에 대해서 고찰해보는 프로젝트다.
한글영어
먼저 csv 파일을 2개 준비한다.
각각 영어 데이터와 한글 데이터를 넣어둔다.
key값은 동일해야 한다.
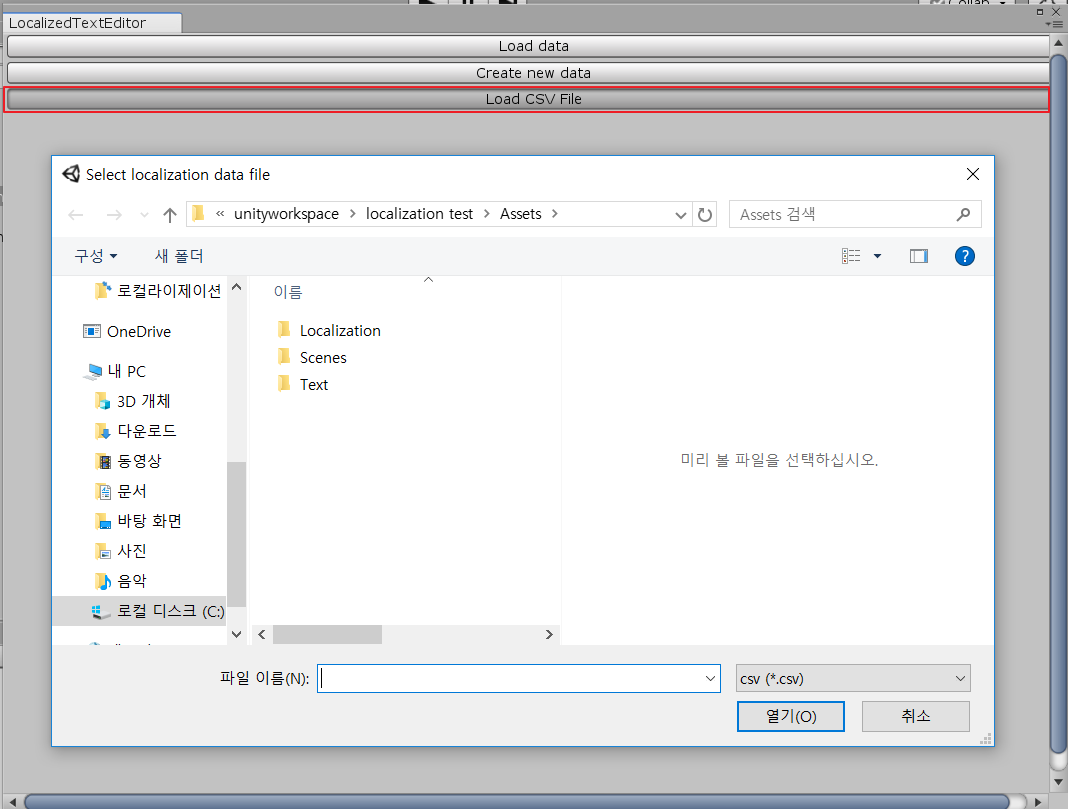
Window > Localized Text Editor > LoadCSVFile
아까 만들었던 csv 파일을 불러온다.
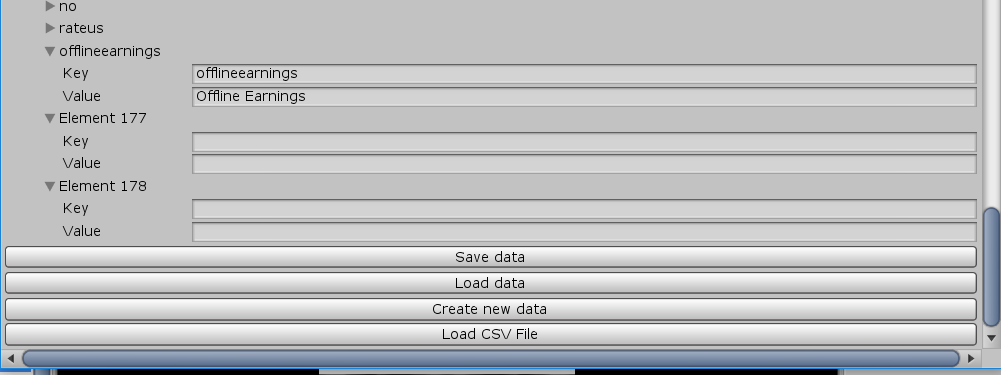
한글 데이터부터 먼저 가져온다.
정상적으로 가져온 것 같지만 2가지 문제가 있다.
한글 데이터 인코딩 문제와 4, 5번 엘리먼트에는 공백이 담겨있다.
공백 데이터에 대해서는 우리는 예외처리를 했으니까 별 상관은 없지만 엘리먼트 숫자를 줄여서 없애도 되고 마음대로 하자
인코딩 문제는 다음과 같이 불러온 데이터가 깨져서 나온다.
웹 쪽 일을 조금 해봤다면 이럴 때 어떻게 해야 하는지 알 것이다.
그렇다 있는 척 좀 해봤다.
C# 내에서 인코딩 건드려서 불러와도 되고 나는 메모장에서 인코딩을 utf-8로 바꿨다.
요렇게 해서 덮어쓰기로 저장한다.
그럼 이제 잘 나온다.
그러면 Save data를 눌러서 위의 경로에 맞추어 저장하도록 하자
파일명은 kor eng로 하겠다.
영어도 똑같이 한다.
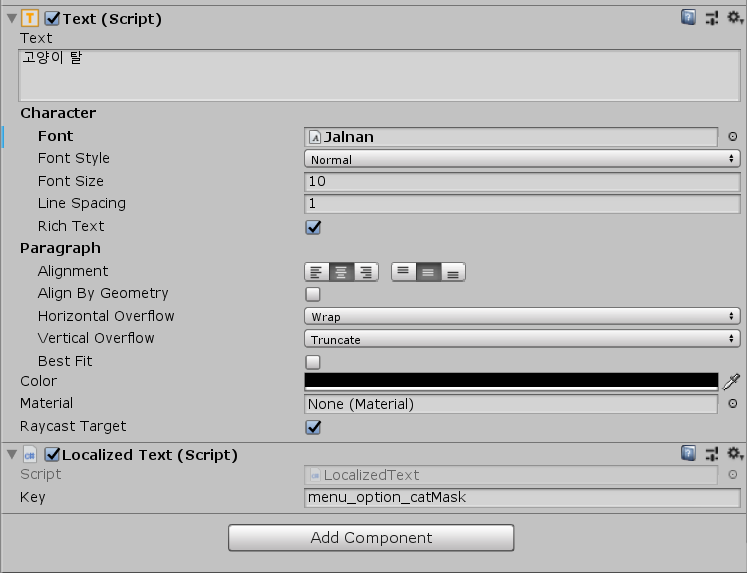
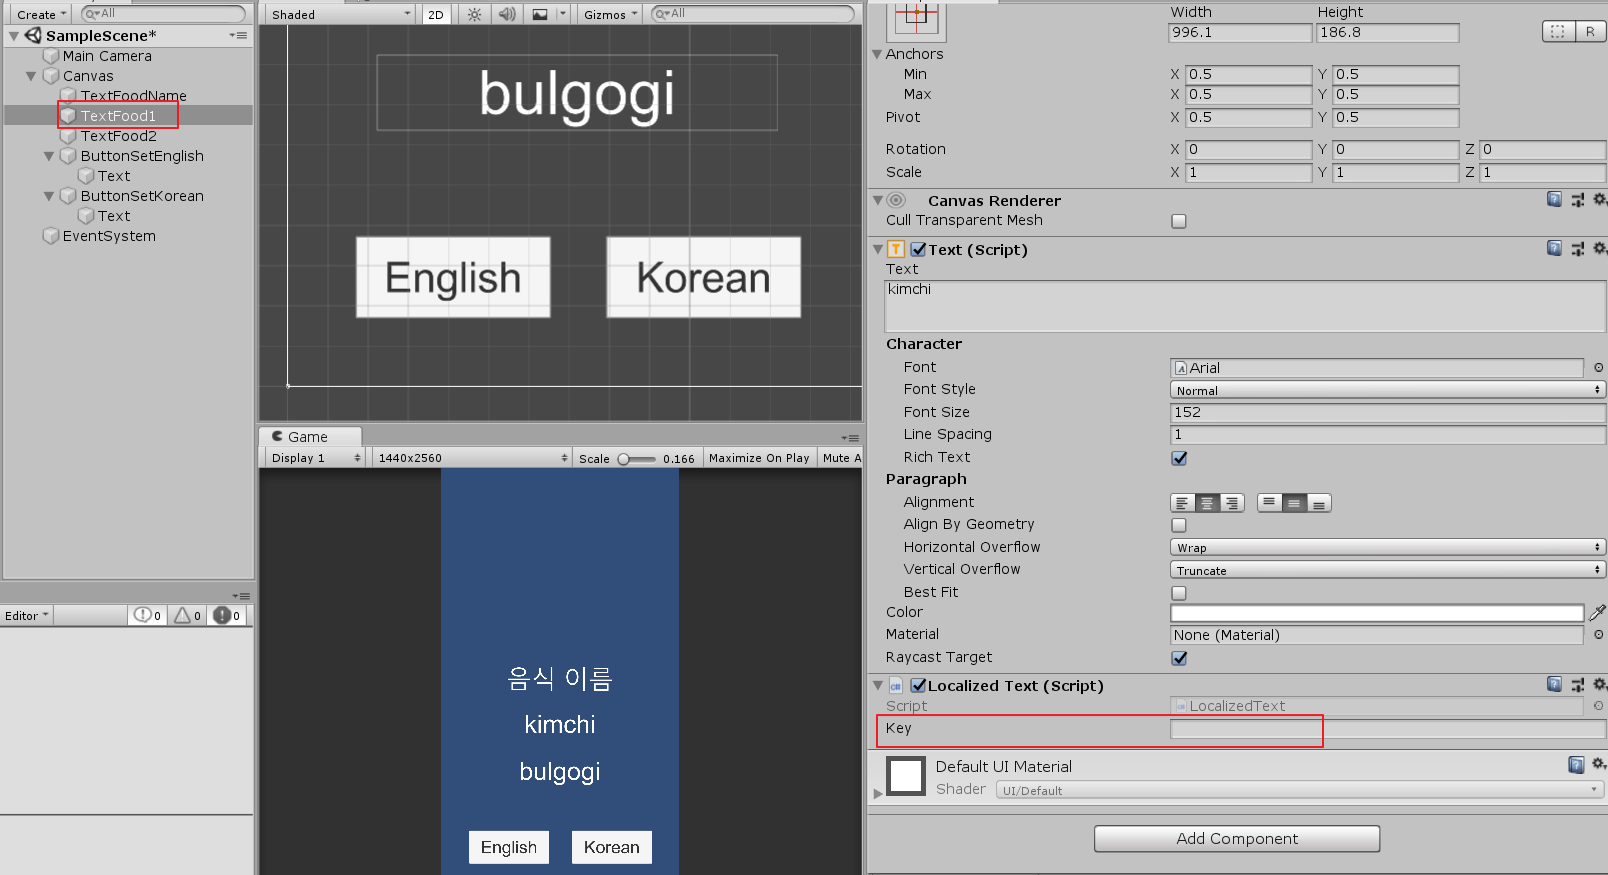
그리고 텍스트 컴포넌트가 붙어있는 텍스트 오브젝트에 Localized Text의 Key에 교체되길 원하는 key값을 적어 넣는다. 우리의 경우 food1이나 food2다.
Localization Manager 오브젝트도 넣고 인스펙터의 File Name에는 최초로 활성화하고 싶은 언어 파일명을 넣는다.
주목할만한 점은 게임성만을 놓고 봤을때 그렇게 중독성이 있거나 하지는 않지만 유튜버들이 이목을 끌기 좋은 콘텐츠라서 유튜버들이 올리면 사람들이 많이 본다.
인플루언서들(influncer) 마케팅을 통하여 해당 게임이 성장하였다고 추측된다.
유튜버들이 해당 게임을 플레이하는 영상 시청률이 적지 않다.음성인식 게임, 1000만 다운로드 이상에 반응도 매우 좋다.
이번 글에서는 음성인식 게임의 핵심 부분을 다뤄보고자 한다.
2. 프로토타입 게임
음성인식 프로토타입 게임
캐릭터는 계속해서 이동하고 소리를 내면(어디 아픈 사람 같지만 아니다.) 내 공의 색이 바뀐다. 공의 색이 바뀐동안 상대방 공을 때린다고 생각하면 된다.
소리를 내서 펀치나 발차기를 하는 게임이라고 상상하자
음성인식 프로토타입 게임 2
엄마는 게임기를 숨겼다. 느낌의 게임이라고 생각하면 된다.
소리를 내서 불량배들을 쫓아내는 게임이다.
3. 핵심 소스코드 및 설명
using System.Collections;
using System.Collections.Generic;
using UnityEngine;
using UnityEngine.Audio;
using UnityEngine.UI;

public class MicrophoneListener : MonoBehaviour
{
    [SerializeField] private Image _imageSound;
    [SerializeField] private Text TextVol;
    public float sensitivity = 100;
    public float loudness = 0;
    public float pitch = 0;
    AudioSource _audio;

    public float RmsValue;
    public float DbValue;
    public float PitchValue;

    private const int QSamples = 1024;
    private const float RefValue = 0.1f;
    private const float Threshold = 0.02f;

    float[] _samples;
    private float[] _spectrum;
    private float _fSample;

   //Written in part by Benjamin Outram

     //option to toggle the microphone listenter on startup or not
     public bool startMicOnStartup = true;

     //allows start and stop of listener at run time within the unity editor
     public bool stopMicrophoneListener = false;
     public bool startMicrophoneListener = false;

     private bool microphoneListenerOn = false;

     //public to allow temporary listening over the speakers if you want of the mic output
     //but internally it toggles the output sound to the speakers of the audiosource depending
     //on if the microphone listener is on or off
     public bool disableOutputSound = false;

     //an audio source also attached to the same object as this script is
     AudioSource src;

     //make an audio mixer from the "create" menu, then drag it into the public field on this script.
     //double click the audio mixer and next to the "groups" section, click the "+" icon to add a
     //child to the master group, rename it to "microphone".  Then in the audio source, in the "output" option,
     //select this child of the master you have just created.
     //go back to the audiomixer inspector window, and click the "microphone" you just created, then in the
     //inspector window, right click "Volume" and select "Expose Volume (of Microphone)" to script,
     //then back in the audiomixer window, in the corner click "Exposed Parameters", click on the "MyExposedParameter"
     //and rename it to "Volume"
     public AudioMixer masterMixer;


     float timeSinceRestart = 0;

     void Start() {
         //start the microphone listener
         if (startMicOnStartup) {
             RestartMicrophoneListener ();
             StartMicrophoneListener ();

             _audio = GetComponent<AudioSource> ();
             _audio.clip = Microphone.Start (null, true, 10, 44100);
             _audio.loop = true;
             while (!(Microphone.GetPosition(null) > 0))  {}
             _audio.Play();
             _samples = new float[QSamples];
             _spectrum = new float[QSamples];
             _fSample = AudioSettings.outputSampleRate;
             //유니티 5.x 부터는 audio source에서 mute를 하면 정상적으로 음성이 안나온다.
             //audio mixer에서 master volume의 db를 -80으로 하여 소리 출력만 안되도록 하면 된다.
             //_audio.mute = true;
         }
     }

     void Update(){
         //can use these variables that appear in the inspector, or can call the public functions directly from other scripts
         if (stopMicrophoneListener) {
             StopMicrophoneListener ();
         }
         if (startMicrophoneListener) {
             StartMicrophoneListener ();
         }
         //reset paramters to false because only want to execute once
         stopMicrophoneListener = false;
         startMicrophoneListener = false;

         //must run in update otherwise it doesnt seem to work
         MicrophoneIntoAudioSource (microphoneListenerOn);

         //can choose to unmute sound from inspector if desired
         DisableSound (!disableOutputSound);

         loudness = GetAveragedVolume() * sensitivity;
         GetPitch();

         //아래는 커스텀 한 소스
         //소리가
         if (loudness > 5f)
             _imageSound.fillAmount = 1f;
         else
         {
             _imageSound.fillAmount = 0.65f;
         }

         FindObjectOfType<GameManager>().currentLoud = loudness;
         //TextVol.text = "vol:" + loudness;
     }


    float GetAveragedVolume() {
        float[] data = new float[256];
        float a = 0;
        _audio.GetOutputData (data, 0);
        foreach(float s in data)
        {
            a+=Mathf.Abs(s);
        }
        return a/256;
    }

    void GetPitch() {
        GetComponent<AudioSource>().GetOutputData(_samples, 0); // fill array with samples
        int i;
        float sum = 0;
        for (i = 0; i < QSamples; i++)
        {
            sum += _samples[i] * _samples[i]; // sum squared samples
        }
        RmsValue = Mathf.Sqrt(sum / QSamples); // rms = square root of average
        DbValue = 20 * Mathf.Log10(RmsValue / RefValue); // calculate dB
        if (DbValue < -160) DbValue = -160; // clamp it to -160dB min
        // get sound spectrum
        GetComponent<AudioSource>().GetSpectrumData(_spectrum, 0, FFTWindow.BlackmanHarris);
        float maxV = 0;
        var maxN = 0;
        for (i = 0; i < QSamples; i++)
        { // find max
            if (!(_spectrum[i] > maxV) || !(_spectrum[i] > Threshold))
                continue;
            maxV = _spectrum[i];
            maxN = i; // maxN is the index of max
        }
        float freqN = maxN; // pass the index to a float variable
        if (maxN > 0 && maxN < QSamples - 1)
        { // interpolate index using neighbours
            var dL = _spectrum[maxN - 1] / _spectrum[maxN];
            var dR = _spectrum[maxN + 1] / _spectrum[maxN];
            freqN += 0.5f * (dR * dR - dL * dL);
        }
        PitchValue = freqN * (_fSample / 2) / QSamples; // convert index to frequency
    }

     //stops everything and returns audioclip to null
     public void StopMicrophoneListener(){
         //stop the microphone listener
         microphoneListenerOn = false;
         //reenable the master sound in mixer
         disableOutputSound = false;
         //remove mic from audiosource clip
         src.Stop ();
         src.clip = null;

         Microphone.End (null);
     }


     public void StartMicrophoneListener(){
         //start the microphone listener
         microphoneListenerOn = true;
         //disable sound output (dont want to hear mic input on the output!)
         disableOutputSound = true;
         //reset the audiosource
         RestartMicrophoneListener ();
     }


     //controls whether the volume is on or off, use "off" for mic input (dont want to hear your own voice input!)
     //and "on" for music input
     public void DisableSound(bool SoundOn){

         float volume = 0;

         if (SoundOn) {
             volume = 0.0f;
         } else {
             volume = -80.0f;
         }

         masterMixer.SetFloat ("MasterVolume", volume);
     }


     // restart microphone removes the clip from the audiosource
     public void RestartMicrophoneListener(){

         src = GetComponent<AudioSource>();

         //remove any soundfile in the audiosource
         src.clip = null;

         timeSinceRestart = Time.time;

     }

     //puts the mic into the audiosource
     void MicrophoneIntoAudioSource (bool MicrophoneListenerOn){

         if(MicrophoneListenerOn){
             //pause a little before setting clip to avoid lag and bugginess
             if (Time.time - timeSinceRestart > 0.5f && !Microphone.IsRecording (null)) {
                 src.clip = Microphone.Start (null, true, 10, 44100);

                 //wait until microphone position is found (?)
                 while (!(Microphone.GetPosition (null) > 0)) {
                 }

                 src.Play (); // Play the audio source
             }
         }
     }}
여기 업데이트 부분을 보면 loudness가 소리 크기를 받아오는 부분이고 GetPitch 함수를 통해 PitchValue에 소리의 높낮이 값을 저장한다.
4. 유니티 세팅 방법
위의 소스코드만 넣는다고 해서 바로 적용이 되지는 않는다.
인터넷에 돌아다니는 소스 코드를 적용해보았더니 내가 내는 소리가 출력이 되어야지 작동을 했었다.